Quantum Teleportation for Control of Dynamical Systems and Autonomy
Electromechanical Engineering Technology Department, College of Engineering, California State Polytechnic University,
Pomona, CA 91768, USA.
Center for Autonomous Systems and Technologies, Department of Aerospace Engineering, California Institute of Technology
1200 E California Blvd, Pasadena, CA 91106, USA.
Atomic, Molecular and Nuclear Physics Department, University of Seville, 41080 Sevilla, Spain.
Department of Mechanical Engineering, University of British Columbia, Vancouver, BC V6T 1Z4, Canada.
Jet Propulsion Laboratory, California Institute of Technology, 4800 Oak Grove Drive, Pasadena, CA 91109, USA.
Abstract
The application of Quantum Teleportation for control of classical dynamic systems and autonomy is
proposed in this paper. Quantum teleportation is an intrinsically quantum phenomenon, and was first
introduced by teleporting an unknown quantum state via dual classical and Einstein-Podolsky-Rosen
channels in 1993. In this paper, we consider the possibility of applying this quantum technique to
autonomous mobile classical platforms for control and autonomy purposes for the first time in this
research. First, a review of how Quantum Entanglement and Quantum Cryptography can be integrated
into macroscopic mechanical systems for controls and autonomy applications is presented, as well as how
quantum teleportation concepts may be applied to the classical domain. In quantum teleportation, an
entangled pair of photons which are correlated in their polarizations are generated and sent to two
autonomous platforms, which we call the Alice Robot and the Bob Robot. Alice has been given a quantum
system, i.e. a photon, prepared in an unknown state, in addition to receiving an entangled photon. Alice
measures the state of her entangled photon and her unknown state jointly and sends the information
through a classical channel to Bob. Although Alice’s original unknown state is collapsed in the process of
measuring the state of the entangled photon (due to the quantum non-cloning phenomenon), Bob can
construct an accurate replica of Alice’s state by applying a unitary operator. This paper, and the previous
investigations of the applications of hybrid classical-quantum capabilities in control of dynamical systems,
are aimed to promote the adoption of quantum capabilities and its advantages to the classical domain particularly for autonomy and control of autonomous classical systems.
Key Words
Quantum teleportation, quantum entanglement, quantum cryptography, quantum robotics and autonomy,
quantum controls, quantum multibody dynamics.
1. Introduction
Quantum teleportation is a fundamental quantum concept that allows one to distribute quantum states
between distant parties, without measuring or having information about them. In future networks of robots
with quantum processing, quantum communication, and quantum sensing capabilities, this quantum
primitive, quantum teleportation, might enable a better communication between robots. This will allow
one, for example, to transfer the outcome of a quantum processing from one robot to a distant robot, for
further quantum processing starting with this quantum state.
Quantum Teleportation by teleporting an unknown quantum state via dual classical and EinsteinPodolsky-Rosen channels was introduced in 1993 [1], which has been demonstrated experimentally [2]
and with deterministic approaches (e.g., [3]-[4]). Measurement of the Bell operator and quantum
teleportation was introduced in 1995 [5]. Since then, various efforts in development of Quantum
Teleportation have been carried out including: Efficient Teleportation Between Remote Single-Atom
Quantum Memories [6], Gain tuning for continuous-variable quantum teleportation of discrete-variable
states [7], Unconditional Quantum Teleportation [8], Complete quantum teleportation using nuclear
magnetic resonance [9], probabilistic resumable quantum teleportation of a two-qubit entangled state [10],
Quantum Teleportation Between Discrete and Continuous Encodings of an Optical Qubit [11], Quantum
teleportation over the Swisscom telecommunication network [12], and Quantum teleportation-based state
transfer of photon polarization into a carbon spin in diamond [13].
The organization of the paper is as follows. A review of Quantum Multibody Dynamics, Controls,
Robotics and Autonomy ([14]-[17]) is given. In this review, quantum entanglement (Section 2.1) and
quantum cryptography (Section 2.2) are used for hybrid classical-quantum control of classical multi-agent
autonomous systems. In Section 2.3, the concept of Quantum Teleportation in conjunction with application
to dynamical systems for autonomy is introduced.
2. Quantum multibody dynamics
Quantum Multibody Dynamics is referred to as the subject of applying quantum physical phenomena
(such as quantum entanglement and superposition) integrated with control of a distributed classical
dynamical system (such as multiple robots and autonomous systems), and analysing the resulting
behaviour of the classical dynamic system when the quantum phenomenon is leveraged for control or
communication purposes. Examples include the application of quantum entanglement and quantum
cryptography protocols to control of robotic systems presented below, which is then further extended to
the application of Quantum Teleportation for control and autonomy purposes in this paper as follows. A
review on our proposal for how quantum entanglement and quantum cryptography can be integrated into
physical mechanical systems for control and autonomy applications ([14]-[17]) is given in Section 2.1 and
Section 2.2.
2.1 Quantum entanglement for dynamic systems
An experimental setup for quantum entanglement is shown in Figure 1. The proposed procedure of
using quantum entangled photons for applications in control of autonomous platforms (Figure 1 to Figure
3), is presented as follows ([14]-[17]), as a hybrid quantum-classical process:
Quantum part:
-
Single photons (pump photons) of 405 nm wavelengths, are generated by a laser diode source.
-
Spontaneous parametric down-conversion (SPDC) process is carried out using a nonlinear crystal,
beta-barium borate (BBO), to split the 405 nm photon beams into correlated entangled pairs of 810
nm wavelength photons. The entangled photon pairs thus generated that are orthonormal in their
polarizations.
-
The entangled photons are sent from the BBO crystal to two beamsplitters (BS) that pass the
photons with horizontal polarization and reflect the photons with vertical polarization.
-
Four Single Photon Counter (SPC) modules are placed as in Figure 1 to Figure 3, where each SPC
counts the number of photons reaching them, and keeps track of the corresponding horizontal and
polarizations (as they pass or are reflected by the beamsplitter, respectively).
-
There are two SPC modules on each autonomous platform. Therefore, each of the autonomous
platforms receives an entangled photon as explained above. This is interpreted as entangling the
autonomous platforms (i.e., robots are sharing entangled photon pairs) by corresponding entangled
photons that are detected by the SPC modules.
-
A Coincidence Counter module records the time at which the photons are reaching the SPC
modules. If the time that a photon pair reaches two SPCs (on two robots), regardless of the
polarization of the photons, is within a small enough time window (e.g., less than 10 ns), then the
photon pair are considered as correlated entangled pairs.
Classical part:
-
The horizontal and vertical polarizations that are received by the SPC modules are converted to 0
and 1 digital signals, respectively, to be used for control of the robotic platforms.
-
The corresponding digital signals that are obtained from the entangled photon polarizations are
sent to digital microcontrollers onboard.
-
Desired control tasks, such as motion commands sent to servomotors onboard, are defined
correspondingly to the digital signals received.
-
The polarizers in between the BBO and the beamsplitters (Figure 1 and Figure 2) is used as
controller tools. They provide the capability of controlling the polarization of the photons as they
pass through them, which alter the polarization of the entangled photons (e.g., horizontal and
vertical polarizations).

Figure 1. An experimental setup for quantum entanglement of autonomous platforms.
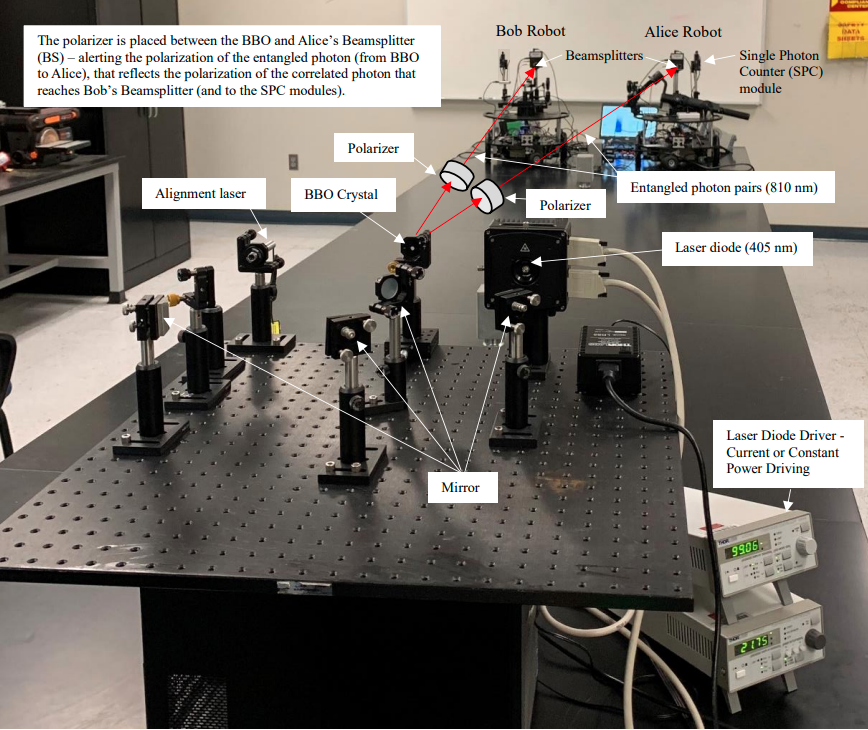
Figure 2. Quantum entanglement of autonomous platforms.

Figure 3. Autonomous platforms sharing quantum entangled photon pairs (the Alice Robot and the Bob
Robot).
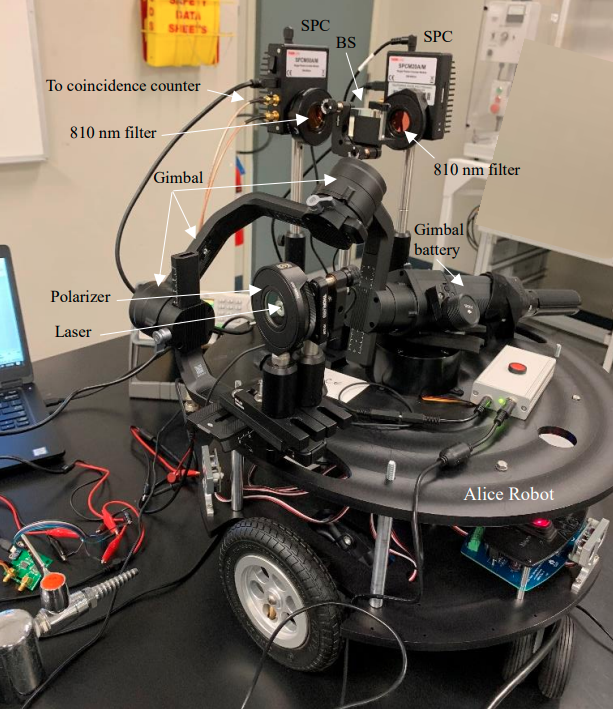
Figure 4. The Alice Robot
2.2 Quantum cryptography for dynamic systems
The quantum cryptography setup for control of autonomous platforms (e.g., robots) is illustrated in
Figure 5. This setup is installed on the same mobile robots in Figure 1 to Figure 4. Only the quantum
cryptography system components are shown in Figure 5 (there is no quantum entanglement system
component in Figure 5) for clear illustration of the setup. The quantum cryptography technique can be
used to encrypt and transfer control commands from the Alice Robot to the Bob Robot (Figure 1 to Figure
5). The quantum cryptography communication technique can be used on its own for control of autonomous
systems. In the case of using quantum cryptography in conjunction with quantum entanglement, one
technique is to first entangle the robots by the quantum entanglement technique (Section 2.1), and then
use the entanglement as a trigger to start the transfer the control commands from the Alice Robot to the
Bob Robot.
The Quantum Cryptography process is as follows.
Quantum part:
-
A single photon is sent from the Alice Robot (Figure 4).
-
A polarizer placed on the Alice Robot is used to control the polarization of the photon as
|−45o⟩,|0o⟩, |45o⟩, and |90o⟩.
-
A polarizer placed on the Bob Robot has additional control on the photon polarization with
|0o⟩,|45o⟩ orientations.
-
After passing through the two polarizers, the photon reaches the beamsplitter which allows the
photons with horizontal polarizations to pass, and the photons with vertical polarizations to reflect.
-
There is a dedicated sensor for each direction of the photon, which either passes or is reflected by
the beamsplitter.
Classical part:
-
The sensor that is dedicated for detecting the horizontally polarized photons sends a digital 0 signal
to a digital microcontroller every time that receives a photon. The sensor that receives vertical
polarized photons sends digital 1 signal to the microcontroller.
-
Desired control commands are defined based on these digital signals for application of autonomy
and robotic tasks.
The detailed discussions of the quantum cryptography protocols and the detection of the eavesdropper
are presented in references [14]-[17]. Autonomous platforms that are considered in this research (in
integrating quantum technologies with mechanical systems) include any stationary or mobile system such
as the ground robots in Figure 2 to Figure 4, or aerial systems such as the drones in Figure 7 and Figure 8.

Figure 5. Quantum cryptography.
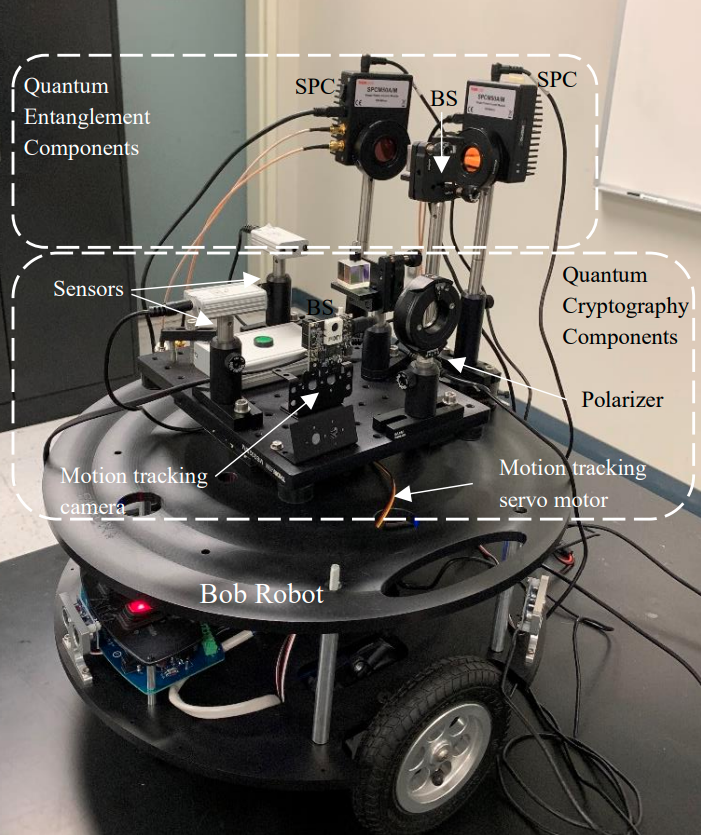
Figure 6. The Bob Robot.

Figure 7. The Bob Ground Robot and the Alice Drone.
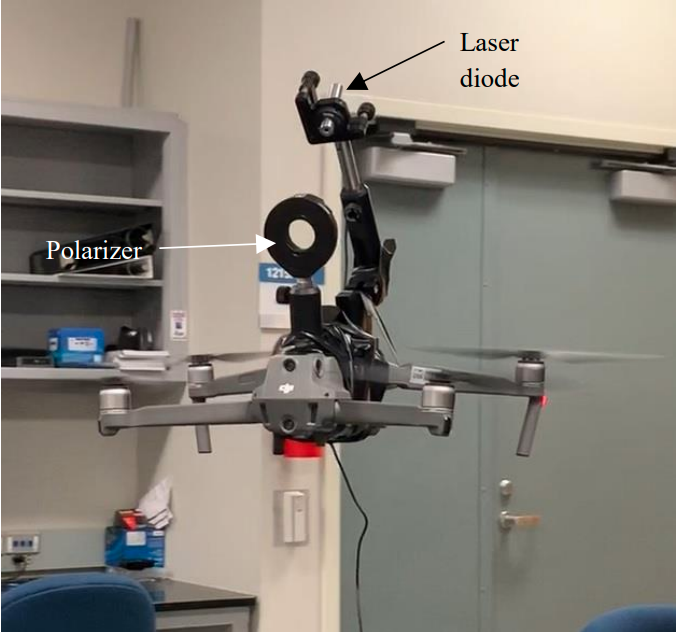
Figure 8. The Alice Drone.
2.3 Quantum teleportation for dynamic systems
The application of Quantum Teleportation for quantum control of classical dynamic systems and
autonomy is proposed here. The Quantum Teleportation technique presented in this section is based on
‘teleporting an unknown quantum state via dual classical and Einstein-Podolsky-Rosen (EPR) channels’
[1]. In a classical system a bit can be copied and transferred (or cloned). By the “No-Cloning Theorem”
[18], a quantum state as a quantum bit, or qubit, unlike the classical bit, can not be copied or cloned.
Transfer of a qubit from one position (Alice) to another (Bob) is proposed to be carried out by a Quantum
Teleportation technique [1]. Quantum Teleportation is applicable to quantum information, quantum
cryptography, and quantum control areas. If a qubit is physically (classically) transported, for instance
from A to B, the required quantum information can be lost. This is due to the sometimes short coherence
times of the quantum states. The Quantum Entanglement phenomenon allows Quantum Teleportation
under the assumption that strong correlation between quanta can be maintained.
We propose to apply quantum teleportation of dual classical and Einstein-Podolsky-Rosen (EPR) channels
technique to mechanical systems, such as autonomous mobile platforms, for control and autonomy
purposes here for the first time. In quantum teleportation, an entangled pair of photons which are correlated
in their polarizations are generated and sent to two autonomous platforms, which we call Alice Robot and
Bob Robot. Alice has been given a quantum system, i.e. a photon, prepared in an unknown state. Alice
also receives one of the entangled photons. Alice measures the state of her entangled photon and sends the
information through a classical channel to Bob. Although Alice’s original unknown state is collapsed in
the process of measurement, due to quantum non-cloning phenomenon, Bob can construct an accurate replica of Alice’s state by applying a unitary operator.
This paper and the previous investigations of the applications of quantum capabilities in control of
dynamical systems are aimed to promote the adoption of unmatched quantum capabilities and advantages
in the classical domain particularly for autonomy and control of autonomous systems. In this context, the
basic scheme of quantum teleportation is as in Figure 1 and Figure 2. In Quantum Teleportation, the goal
is to transfer a quantum state |𝜙1⟩ from the Alice Robot to the Bob Robot. The quantum teleportation
process can be notionally described as follows.
-
Alice generates the quantum state |𝜙1⟩ to transfer to Bob, where |𝜙1⟩ = 𝑎|0⟩1 + 𝑏|1⟩1 , with |𝑎|2 + |𝑏|2 = 1.
-
Quantum entangled states are sent from the BBO (Figure 1 and Figure 2) to Alice and Bob by the
SPDC process. Using Bell basis, the basis of a pair of entangled photons (e.g., a two-qubit-system),
which are correlated by means of their polarizations, is given by

-
Alice and Bob receive the entangled photons.
-
Alice makes a complete measurement of the entangled photon (that receives), and the state |𝜙1⟩.
Thus, the measurement of the state |𝜙1⟩ and the entangled state |Ψ23− ⟩ can be represented as

- After Alice’s measurement, Bob's particle (with indices 3) will have been projected into one of the
four pure states superposed, with equal possibilities. Bob's particle 3 can be presented by the
products of the states in terms of the Bell operator basis as

-
One of the above Bob’s entangled states (one of the four possibilities) is related to the state, |𝜙1⟩,
that Alice is to teleport to Bob. Bob is required to produce a replica of Alice's state.
-
Alice's measurement is transmitted as classical information through a classical channel to Bob.
-
Bob uses the transmitted information from Alice and applies a set of corresponding unitary
transformations on his EPR, according to the Alice’s transmitted state. The unitary transformations

- This transformation brings Bob’s particle to the state of Alice's particle 1 (|𝜙1⟩ ), and the teleportation process is complete.
On the application of quantum teleportation in the context of robotics and autonomy schemes, the
Alice Robot teleports a state |𝜙1⟩ to the Bob Robot. Bob converts the polarization information received
from Alice into corresponding 0 and 1 digital information, which is then processed by on-board
microcontrollers for performing predefined robotic and autonomy tasks.
By accessing quantum computers in future, the on-board classical computation using microcontrollers
may be instead realized by quantum processors. In fact, the application of future quantum computers in a
network of multi-agent dynamic systems, is only logical if quantum-based techniques such as
entanglement and teleportation are employed, rather than any classical wireless communication protocol
in the communication network. In a network of autonomous platforms where multiple robotic agents
containing quantum processors are communicating with each other, using any classical communication
technique may actually defeat the advantages of quantum-enhanced protocols.
Conclusion
We introduced the integration of quantum mechanical phenomena, such as quantum entanglement, into
classical mechanical systems, such as mobile autonomous platforms, as a hybrid classical-quantum system.
In particular, the concept of quantum teleportation by teleporting a quantum state via dual classical and
Einstein-Podolsky-Rosen channels in the context of the control of dynamical systems and autonomy was
proposed. A review of the applications of quantum entanglement and quantum cryptography in developing
quantum-enhanced networks of robotic systems was presented. A proposed procedure of how quantum
technologies could be brought into the domain of classical mechanical systems by employing quantum
entanglement, cryptography and teleportation was described. The research outlined in this paper serves as
a first step towards the application of the advantages of quantum techniques in the physical domain of
macroscopic dynamic systems. Furthermore, this investigation aims to promote future attempts at
exploring the interdisciplinary interface of quantum mechanics and classical system autonomy schemes,
by pushing the engineering boundaries beyond any existing classical technique. Using on-board quantum
processors, instead of classical microcontrollers, is proposed as one future direction of this research.
Acknowledgement
Lucas Lamata acknowledges the funding from PGC2018-095113-B-I00, PID2019-104002GB-C21, and
PID2019-104002GB-C22 (MCIU/AEI/FEDER, UE). Government sponsorship acknowledged. Dr.
Quadrelli’s contribution was carried out at the Jet Propulsion Laboratory, California Institute of
Technology, under a contract with the National Aeronautics and Space Administration.
References
[1] C.H. Bennett, G. Brassard, C. Crépeau, R. Jozsa, A. Peres, & W.K. William, Teleporting an Unknown
Quantum State via Dual Classical and Einstein-Podolsky-Rosen Channels, Physical Review Letters,
Vol. 70, No. 13, 1993, 1896-1899.
[2] D. Bouwmeester, J.-W. Pan, K. Mattle, M. Eibl, H. Weinfurter, & A. Zeilinger, Experimental quantum
teleportation, Nature 390, 1997, 575-579.
[3] M.D. Barrett, J. Chiaverini, T. Schaetz, J. Britton, W.M. Itano, J.D. Jost, E. Knill, C. Langer, D.
Leibfried, R. Ozeri, & D.J. Wineland, Deterministic quantum teleportation of atomic qubits, Nature,
Vol. 429, 2004, 737–739.
[4] K.S. Chou, J.Z. Blumoff, C.S. Wang, P.C. Reinhold, C.J. Axline, Y.Y. Gao, L. Frunzio, M.H. Devoret,
L. Jiang, and & R.J. Schoelkopf, Deterministic teleportation of a quantum gate between two logical
qubits, Nature, Vol. 561, 2018, 368-373.
[5] S.L. Braunstein, & A. Mann, Measurement of the Bell operator and quantum teleportation, Physical
Review A, 51, R1727(R), 53, 1995, 630.
[6] C. Nölleke, A. Neuzner, A. Reiserer, C. Hahn, G. Rempe, & S. Ritter, Efficient Teleportation Between
Remote Single-Atom Quantum Memories, Physical Review Letters, 110, 2013, 140403.
[7] S. Takeda, T. Mizuta, M. Fuwa, H. Yonezawa, P. van Loock, & A. Furusawa, Gain tuning for
continuous-variable quantum teleportation of discrete-variable states, Physical Review A, 88, 2013,
042327.
[8] A. Furusawa, J.L. Sørensen, S.L. Braunstein, C.A. Fuchs, H.J. Kimble, & E.S. Polzik, Unconditional
Quantum Teleportation, Science, Vol. 282, Issue 5389, 1998, 706-709.
[9] M.A. Nielsen, E. Knill, & R. Laflamme, Complete quantum teleportation using nuclear magnetic
resonance, Letters to Nature, Vol 396, 1998, 52-55.
[10]Z.-Y. Wang, Y.-T. Gou, J.-X. Hou, L.-K. Cao, & X.-H. Wang, Probabilistic Resumable Quantum
Teleportation of a Two-Qubit Entangled State, Entropy, 21, 2019, 352; doi:10.3390/e21040352.
[11]A.E. Ulanov, D. Sychev, A.A. Pushkina, I.A. Fedorov, & A.I. Lvovsky, Quantum Teleportation
Between Discrete and Continuous Encodings of an Optical Qubit, Physical Review Letters, 118, 2017,
160501. DOI: 10.1103/PhysRevLett.118.160501.
[12]O. Landry, J.A.W. van Houwelingen, A. Beveratos, H. Zbinden, & N. Gisin, Quantum teleportation
over the Swisscom telecommunication network, Journal of Optical Society of America B, Vol. 24, No.
2, 2007, 398–403.
[13]K. Tsurumoto, R. Kuroiwa, H. Kano, Y. Sekiguchi, & H. Kosaka, Quantum teleportation-based state
transfer of photon polarization into a carbon spin in diamond, Communications Physics, 2:74, 2019.
https://doi.org/10.1038/s42005-019-0158-0.
[14]F. Khoshnoud, I.I. Esat, M.B. Quadrelli, D. Robinson, Quantum Cooperative Robotics and Autonomy,
Special issue of the Instrumentation Journal, Edited by C.W. de Silva, Vol. 6, No. 3, pp. 93-111, 2019.
[15]F. Khoshnoud, I.I. Esat, S. Javaherian, & B. Bahr, Quantum Entanglement and Cryptography for
Automation and Control of Dynamic Systems, Special issue of the Instrumentation Journal, Edited by
C.W. de Silva, Vol. 6, No. 4, pp. 109-127, 2019.
[16]F. Khoshnoud, I.I. Esat, C.W. De Silva, M.B. Quadrelli, Quantum Network of Cooperative Unmanned
Autonomous Systems, Unmanned Systems, Vol. 07, No. 02, 2019, 137-145.
[17]F. Khoshnoud, D. Robinson, C.W. De Silva, I.I. Esat, R.H.C. Bonser, M.B. Quadrelli, Researchinformed service-learning in Mechatronics and Dynamic Systems, American Society for Engineering
Education conference, Los Angeles, April 4-5, 2019, Paper ID #27850.
[18]M. Nielsen, I. Chuang, Quantum Computation and Quantum Information, Cambridge University
Press, New York, USA, 2011.
Farbod Khoshnoud, Ph
Farbod Khoshnoud, PhD, CEng, PGCE, HEA Fellow, is a faculty member in the college of engineering
at California State Polytechnic University, Pomona, and a visiting associate in the Center for
Autonomous Systems and Technologies, in the department of Aerospace Engineering at California
Institute of Technology. His current research areas include Self-powered and Bio-inspired Dynamic
Systems; Quantum Multibody Dynamics, Robotics, Controls and Autonomy, by experimental
Quantum Entanglement, and Quantum Cryptography; and theoretical Quantum Control techniques.
He was a research affiliate at NASA’s Jet Propulsion Laboratory, Caltech in 2019, an Associate
Professor of Mechanical Engineering at California State University, 2016-18, a visiting Associate
Professor in the Department of Mechanical Engineering at the University of British Columbia (UBC) in 2017, a Lecturer in the
Department of Mechanical Engineering at Brunel University London, 2014-16, a senior lecturer and lecturer at the University
of Hertfordshire, 2011-14, a visiting scientist and postdoctoral researcher in the Department of Mechanical Engineering at
UBC, 2007-11, a visiting researcher at California Institute of Technology, 2009-11, a Postdoctoral Research Fellow in the
Department of Civil Engineering at UBC, 2005-2007. He received his Ph.D. from Brunel University in 2005. He is an associate
editor of the Journal of Mechatronic Systems and Control.

Prof. Lucas Lamata is an Associate Professor (Profesor Titular de Universidad) of Theoretical Physics at
the Departamento de Física Atómica, Molecular y Nuclear, Facultad de Física, Universidad de Sevilla,
Spain. His research up to now has been focused on quantum optics and quantum information, including
pioneering proposals for quantum simulations of relativistic quantum mechanics, fermionic systems, and
spin models, with trapped ions and superconducting circuits. He also analyzes the possibility of combining
artificial intelligence and machine learning protocols with quantum devices. Before working in Sevilla,
HeI was a Staff Researcher (Investigador Doctor Permanente) at the University of the Basque Country,
Bilbao, Spain (UPV/EHU), leading the Quantum Artificial Intelligence Team, a research group inside the
QUTIS group of Prof. Enrique Solano at UPV/EHU. Before that, he was a Humboldt Fellow and a Max Planck postdoctoral
fellow for 3 and a half years at the Max Planck Institute for Quantum Optics in Garching, Germany, working in Prof. Ignacio
Cirac Group. Previously, he carried out his PhD at CSIC, Madrid, and Universidad Autónoma de Madrid (UAM), with an FPU
predoctoral fellowship, supervised by Prof. Juan León. He has more than 100 articles, among published and submitted, in
international refereed journals, including: 1 Nature, 1 Reviews of Modern Physics, 1 Advances in Physics: X, 3 Nature
Communications, 2 Physical Review X, and 19 Physical Review Letters, two of them Editor's Suggestion. His h-index
according to Google Scholar is of 35, with more than 4400 citations.

Clarence W. de Silva has been a Professor of Mechanical Engineering at the University of British
Columbia, Vancouver, Canada since 1988. He received Ph.D. degrees from Massachusetts
Institute of Technology and University of Cambridge, U.K., honorary D.Eng. degree from
University of Waterloo, Canada, and the higher doctorate (ScD) from University of Cambridge.
He is a Fellow of: IEEE, ASME, Canadian Academy of Engineering, and Royal Society of
Canada. Also, he has been a Senior Canada Research Chair, NSERC-BC Packers Chair in
Industrial Automation, Mobil Endowed Chair, Lilly Fellow, Senior Fulbright Fellow, Killam
fellow, Erskine Fellow, Professorial Fellow, Faculty Fellow, Distinguished Visiting Fellow of
Royal Academy of Engineering, UK, and a Peter Wall Scholar. He has authored 25 books and
over 550 papers, approximately half of which are in journals. His recent books published by Taylor & Francis/CRC are:
Modeling of Dynamic Systems—with Engineering Applications (2018); Sensor Systems (2017); Senors and Actuators—
Engineering System Instrumentation, 2nd edition (2016); Mechanics of Materials (2014); Mechatronics—A Foundation Course
(2010); Modeling and Control of Engineering Systems (2009); VIBRATION—Fundamentals and Practice, 2nd Ed. (2007); by
Addison Wesley: Soft Computing and Intelligent Systems Design—Theory, Tools, and Applications (with Karray, 2004), and
by Springer: Force and Position Control of Mechatronic Systems—Design and Applications in Medical Devices (with Lee,
Liang and Tan, 2020).

Dr. Quadrelli is a Principal Member of the Technical Staff, and the supervisor of the Robotics
Modeling and Simulation Group at JPL. He has a degree in Mechanical Engineering from Padova
(Italy), an M.S. in Aeronautics and Astronautics from MIT, and a PhD in Aerospace Engineering
from Georgia Tech. After joining NASA JPL in 1997 he has contributed to a number of flight
projects including the Cassini-Huygens Probe, Deep Space One, the Mars Aerobot Test Program,
the Mars Exploration Rovers, the Space Interferometry Mission, the Autonomous Rendezvous
Experiment, and the Mars Science Laboratory, among others. He has been the Attitude Control
lead of the Jupiter Icy Moons Orbiter Project, and the Integrated Modeling Task Manager for the
Laser Interferometer Space Antenna. He has led or participated in several independent research
and development projects in the areas of computational micromechanics, dynamics and control of tethered space systems,
formation flying, inflatable apertures, hypersonic entry, precision landing, flexible multibody dynamics, guidance, navigation
and control of spacecraft swarms, terra-mechanics, and precision pointing for optical systems. He is an Associate Fellow of the
American Institute of Aeronautics and Astronautics, a NASA Institute of Advanced Concepts Fellow, and a Caltech/Keck
Institute for Space Studies Fellow.
Cal Poly Pomona
Arxiv